Programming 3D graphics from scratch
On reflection, this is not a good Raspberry Pi activity. Everything works, but the Raspberry Pi is too slow at the central computations, and it makes the exercise a little painful. This activity is still worthwhile, but much better done on a laptop or desktop machine.
This page gives details on how to create 3D graphics in Python. This is not a topic I teach, nor a research area of mine. I chose 3D graphics as an accessible (and hopefully fun) task that can be tackled without much prior knowledge. The approach taken is ‘from scratch’, i.e. building images pixel by pixel. Although this task may seem ‘old hat’ or simplistic, the need to make these computations efficient on a massive scale has had a big impact on hardware design for a number of years.
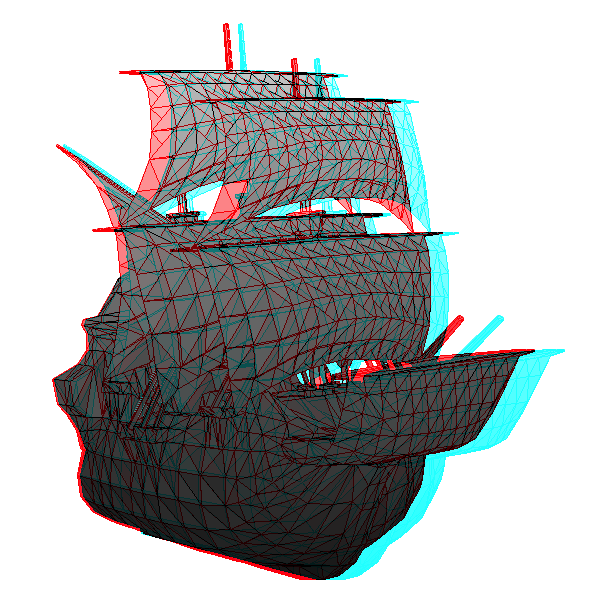
The eventual aim is to create code that can run on a Raspberry Pi to generate a selection of 3D models which can be remotely chosen and rotated from a smartphone app. The images should appear in 3D on a 3D capable TV, or in red/cyan anaglyph on a normal screen, for which you will need a pair of tinted 3D glasses. There are some other suggested Raspberry Pi projects at the bottom of the page.
Notes on the programming:
- All the coding is in Python.
- The initial examples run in either Python 2.7.3 or Python 3.x
- The later examples make use of Python Imaging Library (PIL), and will only run if that is installed. It is currently only available for Python 2.7.3.
- A Raspberry Pi comes with Python 2 and Python 3 preinstalled. The Raspberry Pi notes include details of how to install PIL and access Python.
- There are many other resources for Raspberry Pi information on the web, or you can email me a question.
First program: drawing a triangle (right click to download).
- There are many sophisticated libraries and languages that can do this much more neatly and in fewer lines of code, but the idea here is to see how to do things from first principles.
- The program uses only tkinter, python’s standard GUI building package, which comes with all Python distributions.
- There are many comments in the code to help you follow what it is doing.
- The code as given only draws half the triangle! You must work out how to draw the other half.
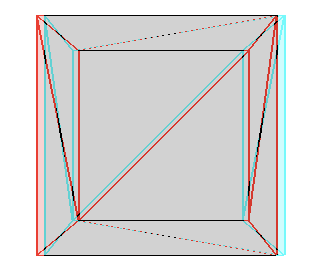
Second program: drawing a cube (right click to download).
- This program uses the triangle drawing of the first, although slightly improved.
- There is a new function to project an (x,y,z) coordinate onto an (x,y) coordinate at z=0.
- This projection depends on where you are looking from!
- We project each point once for the left eye and once for the right eye and build two separate images.
- The code only contains the instructions for the left eye – you must work out what is required for the right eye!
- Finally we combine the images to produce our first 3D image.
- The key parameter for determining the amount of 3D effect is ‘eye_separation’, play around with it and see what impact it has.
- See if you can work out and enter the data for some other image of your choice, e.g. the pyramids a Giza!
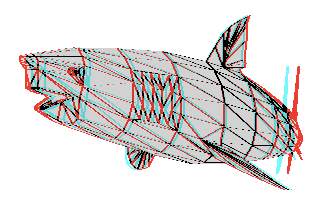
Third program: drawing a more complex image (right click to download).
- This program now loads a long list of vertices and triangles from a data file (getdata function). You can specify the data files in the Image_Name parameter at the top. You will need to download the appropriate data files (two for each image) and put them in the same folder as the Python code.
- Several other new functions exist:
- draw, which simply moves the drawing code into a function so we may call it repeatedly
- sort_triangles, controlled by the parameter ‘sorting’. This sorts the triangles so we draw the furthest away first. Try turning sorting off (change the line near the top to ‘sorting = False’) and see what happens.
- rotate, which allows rotation about the y axis. First convert the x,y,z coordinates to polar coordinates, then change the angle and convert back to x,y,z. I have left rotation about the other axes as an exercise.
- Some functions linked to key presses that change a parameter and then redraw the image.
- The main code now loads up the data, sets some parameters appropriately (e.g. position of the eyes), sorts the triangles and draws the image.
- Finally it ‘binds’ some keys to particular functions, before passes control to the window. This allows you to rotate the model by pressing z or x, and to change eye_separation by pressing q or e.
- Try adding more functions linked to key presses, e.g. different rotations, or zooming in or out etc.
- You may have noticed things are getting slow now – we will eventually get things working more quickly by calling some image-processing libraries.
- To speed things up for testing, at the very top of the code set fullscreen to False and set w,h to smaller values.
Fourth program: adding remote control (right click to download).
- We need another library to enable remote control: ‘socket’ which will listen for messages.
- The main code now starts with setting up a socket – a bit like a postbox with an address (your IP) and a number (port number, here 6005).
- I have tried to helpfully print out the IP address once the socket is set up, but it may not work on some systems (i.e. linux and therefore the raspberry pi, which returns a useless 127.0.0.1 regardless. On a raspberry pi you can type “hostname -I” at the command prompt to discover your IP address.)
- The rest of the code, in this example, just repeatedly checks for a message, turns the bytes received into a string ‘message’, and prints it out.
- An ‘if’ statement shows how you can then take appropriate action depending on the message received.
- In order to test this you will need to send messages, there are some free apps for iPhones and on Android that will do it.
- For the iPhone UDP Remote from Alcorn McBride is easy to use and customisable. In Settings change the IP address and the messages generated.
- For Android Simple UDP Tester looks like it would do the job, although there is probably a better option if you search around.
- Once you have UDP messaging working, you can incorporate it into the code to change/rotate images.
- Note that the program hangs when waiting for a message. This is not ideal.
Final program: putting it together (right click to download).
- Things have been getting slow. So the new version replaces our hand coded triangle creation and image merging functions with library versions from Python Imaging Library. Apart from the fact that our efficiency could probably be greatly improved, e.g. by only merging parts of the image that are not blank, the big difference is that our Python code is interpreted ‘live’ by the computer, whereas the imaging libraries are compiled, i.e. have already been converted into machine code. If we really wanted to be quick, we would pass much of the work to the GPU.
- You will need PIL installed to run the next program, and for PIL you will need to be running Python 2.7, not Python 3.
- The function that listens for messages (changeImage) is called using a ‘thread’. This means the computer will both listen for a message and continue with the rest of the program. This prevents the hang waiting for a message before continuing.
- Finally some simple shading has been added, with lower triangles shaded darker.
Further tasks.
- There are lots of elements in the program that could be made more efficient, for example only merging pixels that have been changed in either image.
- There is additional functionality that could be added, e.g. more rotations, zooming and panning using various key bindings.
- Additional images could be created. I will offer a prize for the best (home-made) image sent to me before term starts in October.
- The sorting and shading could be improved to give more reliable and realistic results, lines around the triangles could be turned off.
- If you are keen to move away from doing it all from first principles and want to speed things up considerably, look at Pi3d which pushes all the work to the GPU.
Completely different projects.
- You could adapt the existing code to create a remote control photo slideshow, with smartphone control to move backward/forward, switch on autoplay or to zoom in or out of photos.
- A lot of our students have used Raspberry Pis to make media servers.
- One of our former students has blogged about making a Harry Potter/Weasley clock. (Alastair was an undergraduate, who then stayed on to do an MSc and is now doing a Phd at Bath).
- Another popular starting project is a camera trap or motion detecting security/wildlife camera.
- A more fundamental project is to program your Raspberry Pi in assembler, leading up to creating your own simple OS. We will look at assembler programming in first year Machine Architecture, but you can make a start with Baking Pi if you are interested.
Raspberry Pi is a trademark of the Raspberry Pi Foundation